December 10, 2007

Token knowledge

Standards are great. But lack of documentation is bad. Documentation needs to exist at various levels. You should have very technical documentation, for people interested in all the knitty gritty stuff. You should also have superficial overviews for people who aren't interested in the details. And then you should have documentation like this. Enough info for you to follow and do something, but not too much that your head spins. I had to search around for half a day to pick up enough technical information to make it possible. Then with very basic understanding of how things 'should' work, I put together the system.

The thing is, with security applications, a little knowledge is a very bad thing. If you design a security system without a proper understanding of the entire architecture, you may just be creating a very hackable system, will multiple holes just waiting to be exploited. So I don't claim that this system is unhackable or even secure. So since you've read this far without knowing what I'm talking about - here it is. The little project intends to utilize your PKCS11 compliant security token to extract a pin-locked secret for whatever you decide to do with it.

The idea is that a security token is a hardware device which stores some sensitive information, sort of like a physical key contains ridges and valleys. Let's go thru some terminology to get you started when reading other docs about PKCS11.

PKCS11 is the standard API for hardware security tokens. This can be smart cards, USB smart tokens, or Hardware Security modules. All these devices have one thing in common. They store keys. Some also store certificates. That's another PKCS standard - I think its PKCS12 but you have to check that.

Token refers to the device. To access your token you need a PIN. PIN can mean text as well - not just numbers. Inside the token there is a keystore. The keystore stores keys. Think of it like a key chain. To access your keystore you may need a password. Keys are stored in a way that you can easily access a key by an alias - or a name.

So our basic process is thus - Access the key, then unlock it, open the keystore and get the key we want based on its alias. Simple? Yes. By the way, the language we will use is Java - so if you're looking for a way to do this using another language - look elsewhere.

Setup - First install your token drivers. Make sure your OS can recognize the token and that the token has PKCS11 interfaces. There will be a library which provides this interface. On Windows this will be a DLL, on Linux, a .so file. You will need to find this file, or guess what it is, if there's no documentation to help you. For Safenet tokens and smartcards its dkck201.dll. Once you found this file, you need to create a config file - which is a text file. It's possible to go without the text file but lets just make the file.
Here is what the file contains (pkcs11.cfg).


name = SmartCard
library = c:\windows\system32\dkck201.dll
slot=14

Friendly name of SmartCard, location of library and slot. Oh yea... another definition. Slot refers to the the smart card reader, in case you plugged in several readers. You can find out the slot from your smart card reader driver, or you can iterate all the slots until you find the card you want. I won't bother with this.

Once you have your config file, its time to code

String pkcs11ConfigFile = "d:\\pkcs11.cfg";
Provider pkcs11Provider =
new sun.security.pkcs11.SunPKCS11(pkcs11ConfigFile);
Security.addProvider(pkcs11Provider);

Here you tell the Java Security system to configure itself based on the config file. You're adding a provider - which is your smartcard, token or HSM.

Work - Now you do your stuff. A little guide to useful string conversion functions. Call toCharArray() to convert a String to a char[]. Call getBytes() to convert a String to a byte[]. Call new String(byte[]) to convert byte[] into a string.


KeyStore ks = KeyStore.getInstance("PKCS11");
ks.load(null, defaultPIN.toCharArray() );


Here we open our token and unlock they keystore using the default pin. Note the keystore isn't pin protected.


SecretKeySpec key = new SecretKeySpec(secret.getBytes(),"DES");

Here we're creating a secret key. Note that secret is a string and we're creating a SecretKey object from our string. I used DES mainly because it worked for our 8 char secret. Your results may vary. If you're using a specific encryption algorithm, you should probably create a key for that algorithm. I'm not going to show you how here.


ks.deleteEntry(keyalias);
ks.setKeyEntry(keyalias,key,sPIN.toCharArray(),null);

We delete any keys at our keyalias, then store our new key in the keystore, using the keyalias. That's it!

But wait. How do you get the key out, after you've put it in? Here's how

KeyStore.SecretKeyEntry skEntry = (KeyStore.SecretKeyEntry)
ks.getEntry(keyalias, null);
byte data[] = skEntry.getSecretKey().getEncoded();
String secret = new String(data);

Get the key store entry under the keyalias. Get its encoded value - this will not work for all key types - but it works for this one. Then convert the byte array to a string. There's your secret. Now you can do what you want to it. Notice you have to unlock and load the keystore before you do this - so the PIN is necessary. And we're done. A quick 5 minute project for learning enough about PKCS11 to impress other people who don't know anything about PKCS11. Impressed? Thankful? You're welcome.
November 15, 2007

JDBC Connection pools in Sun Application Server

Here is a little problem which lasted 2 hours. The question is, how does one use JDBC Connection pools managed by the Sun Application Server? If you look in the administration guide, it won't tell you anything. Ask a bunch of experts on Sun forums, and they tell you nothing. This little entry should resolve your problems.

There are two main things to consider when setting up the connection pools.
1. JDBC Driver - Your DB of choice comes with a JDBC driver. Your Sun application server does not. So your first order of business is to add your JDBC driver to the Sun Application Server classpath. The surest way to do this is by going through the web admin console and adding the full path to the JDBC driver JAR file in one of the classpath boxes. Go to Application Server -> JVM Settings -> Path settings. I added the MySQL JDBC driver to Classpath suffix. Now you can set up connection pools and JDBC resource. This is the straight-forward stuff which IS documented. Then when you ping the connection pool, you should get Ping Success instead of class not found.

2. JNDI Name - If you use Netbeans, It might set up the JNDI name incorrectly which is the cause of the 2 hour search for answers. Netbeans smartly uses "java:comp/env/<JDBC Resource Name>" when what really worked was simply "<JDBC Resource Name>". Thus the code to get the datasource should be


javax.naming.Context c = new javax.naming.InitialContext();
return (javax.sql.DataSource) c.lookup("<JDBC Resource Name>");


After all that, don't forget to restart the Application Server. Now you can thank me for saving you 2 hours.

November 06, 2007

File upload

Today I was racking my brain thinking about how to transfer some sensitive files from one secure server to another. The secure server had most of its ports blocked, so FTP or other file transfer methods were out. I didn't want to bother with a cumbersome HTTP Proxy. Besides the files were secret so it shouldn't go to a third party. I wish there was a module I could enable on my web server to a HTTP file upload. This is it. It's two PHP page and an upload folder. I snipped it off a website, took out the file type and file size restrictions and I have a PHP module that will accept any file. This is potentially bad, security wise but we can practice security by obfuscation - meaning as soon as the file transfer is done, delete the module.

September 25, 2007

Forgot your Windows password?

This happened to me, not on my laptop but on a seldom used development box. Rather than reinstall everything again, I remembered the password. Yay! But what if I can't remember. Try this:

http://home.eunet.no/pnordahl/ntpasswd/

July 19, 2007

Microsoft Message Queue from Classical ASP

After days and days of doing absolutely nothing, I needed something to reaffirm my skills. Here it is - a task assigned to a couple of junior programmers. They weren't able to complete. Their supervisors weren't able to help them. Enter technosock! I took on the challenge and succeeded. Yay! The problem: We have a long running ASP transaction. We want to use MSMQ to store the event and do the processing later. Task: Use ASP to store the event.

Setup

MSMQ needs to be installed on a domain controller. I think so. So create a Windows 2003 server, and a new domain. I make it the Primary Domain Controller. I also install the Microsoft Message Queue components. All of them.

On the client side, I tried writing VB6 code from my PC - it didn't work. My guess is that you have to be a domain member. Fuck that! I'll write ASP and host it directly of the server in question. So I install IIS and enable Classical ASP (its disabled by default).

Code

There are four functions which I tried. First of all, we need to create the queue. Secondly, we write a message to the queue. Thirdly we read from the queue and fourth we delete the queue. Straight forward? Yes.

Create the queue


Set qi = Server.CreateObject("MSMQ.MSMQQueueInfo")
qi.PathName = ".\MyQueue"
qi.Create


qi is a queue info. MyQueue is the name of the queue. .\ means use the local hostname.

Send a message the queue


DIM MQ_SEND_ACCESS, MQ_DENY_NONE
MQ_SEND_ACCESS = 2
MQ_DENY_NONE = 0

Set qi = Server.CreateObject("MSMQ.MSMQQueueInfo")
Set msg= Server.CreateObject("MSMQ.MSMQMessage")
qi.PathName = ".\MyQueue"
Set objQ = qi.Open( MQ_SEND_ACCESS, MQ_DENY_NONE )

msg.Label = "Label"
msg.Body = "Body"

msg.Send objQ, 0


objQ is the queue. Use qi.Open to get it. The parameters MQ_SEND_ACCESS and MQ_DENY_NONE are constants. The values are 2 and 0. Create a message object msg then send it to the queue objQ.


Receive a message from the queue


Dim qi
Dim ReceiveQ
Dim msg
DIM MQ_DENY_NONE
Dim MQ_RECEIVE_ACCESS

MQ_DENY_NONE = 0
MQ_RECEIVE_ACCESS = 1

Set qi = Server.CreateObject("MSMQ.MSMQQueueInfo")
Set msg = Server.CreateObject("MSMQ.MSMQMessage")

qi.PathName = ".\MyQueue"

Set ReceiveQ = qi.Open(MQ_RECEIVE_ACCESS, MQ_DENY_NONE)

Set msg = ReceiveQ.Receive(3, false, true, 1000, false)
If msg is Nothing Then
     Response.write "No message was received"
Else
     Response.write "Message received<br>"
     Response.write msg.Body
End If

ReceiveQ.Close


ReceiveQ is the queue. Its opened with MQ_RECEIVE_ACCESS. Call ReceiveQ.Receive to get the message. The parameters 3, false, true, 1000, false are mostly flags. The value 1000 is the timeout in milliseconds.

Delete the queue


Set qi = Server.CreateObject("MSMQ.MSMQQueueInfo")
qi.PathName = ".\MyQueue"
qi.Delete


Same as the first snippet. Just change Create to Delete

Conclusion

There you have it. MSMQ in under five minutes. Ok so it took a couple hours to set up Windows Server 2003 and IIS and MSMQ. But after you start writing ASP code, its just a few lines of code. There's lots more you can do with message queues like sending binary objects, restricting who has access to the queue and so forth. Message Queues are a good idea. MS has some good tools but documentation is a but lacking in my opinion. I had trouble searching for most of the things - could be because my connection is terrible. Anyway I've done all the hard stuff so you don't have to.

July 16, 2007

Project Guest Manager

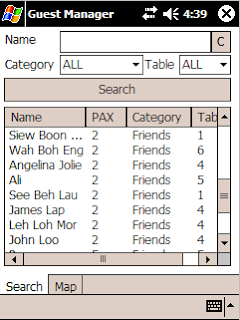
Sometimes when I'm bored or when there is a need, I need applications for my own use, or for fun. I'll highlight them here from time to time. This application I started one afternoon when I was bored. It's a guest list manager which is comprised of a read-only Pocket PC mobile client and a desktop application which allows you to enter guest names, number of guests, their category and which table they will sit. It's very Chinese banquet oriented because the tables seat a recommended 10 people.

I wrote the Pocket PC mobile client first. It took about 10 hours over friday-sunday. The desktop application also took about 10 hours, over monday-tuesday. The database is a pocket access database but as I found out, ADOCE has been discontinued for windows mobile 5 which makes my app obsolete before even being released. Thus my dreams of charging people for my 20 hours of work has gone down the drain. I hate you Microsoft. Pocket Access wasn't great but at least it filled a need. The need to have a database sync to pocket pc automatically. I didn't need the fancy table joins and macros. I didn't need super high performance.

Anyway the apps are simple. On pocket PC you need three files.


  1. GuestManager.exe (which is an ARM based pocket PC app)

  2. \My documents\GuestList.cdb (which is a pocket access database - converted from a desktop MDB)

  3. \My documents\map.png (which is the table layout of the banquet you're organizing).


The trick is converting the MDB to CDB. You need an old Active Sync. If your Pocket PC can't work with an old Active Sync, you're out of luck.

On the desktop you need the GuestManagerDesktop.exe and the GuestList.mdb in the same directory.

The desktop app does some cool things.

  1. It stores state information in an xml file. It remembers the location of the last database and reloads it.

  2. We print 3 types of documents (alphabetical guest list, guests by table, guest by category) without use of special report components. It's not easy because it involves complex looping and special index and counters.


Some features of the desktop app.

  • Add any number of tables and categories just by adding a guest to the table or category. The table and category are combo-boxes which allow test entry. It supports special characters (as far as i know) - Not sure about unicode though.

  • Guest list is browsable by table and the application indicates unfilled, filled, and overfilled tables using colour cues.

  • Able to delete and move guests by right-clicking on the guest name or selecting from the menu.

  • Able to change guest details by selecting the guest, changing the details and clicking on Save.

  • Save will either insert a new guest or update an existing one, depending on whether the guest already exists.

  • Performs analysis of guest to table distribution.

  • Console log allows you to revisit all the actions performed in that session.

  • Allows printing of three kind of reports with checklist boxes:

  • a. table listing
    b. alphabetical guest listing
    c. listing by category

I'm pretty happy with the app. It could use a bit more polish such a splash screen or a nag window and some crippleware. Maybe the log could be persistant.

July 05, 2007

Windows Services

I would write more articles if things worked right and I understood everything. But sometimes things go wrong and I don't really know why and I can't be bothered to find out why. About a year ago I followed some articles online and wrote a Windows Service in VB.NET. Everything worked great. I had a service I could start and stop. The service had its own event log. Yesterday I tried to recreate the service for another project. It didn't want to create its own event log, and that's why I can't write about it.

But I don't care. Maybe if I solve the problem, I'll add a comment to this entry but here is a guide on writing a Windows Service using VB.NET. There are other guides available. Its actually quite simple so any guide will do. This is mine.

If you have MS Visual Studio .NET, you will probably have a project type option called Windows Service. Select that! The project loads and your workspace is all gray. Click inside the gray area and click on Add Installer. That will create another gray area with two things inside. You have to edit a few properties on the Service Installer and Service Process Installer such as:


  1. The account under which the service will run

  2. The service name

  3. The service description


Now you need to get installutil.exe from somewhere. I think its in the dotnet framework. Put it in your bin folder. Write a couple batch programs to install and uninstall the service. If your service compiles to Service.exe your install script will be
installutil Service.exe
Your uninstall script will be
installutil /u Service.exe

Build your project and run the install. Go to Services (Administrative Tools) and manually start your service. There... it runs. Now stop the service. And run the uninstall script. You have to do this everytime before you compile your app. Remember to stop your service and uninstall. If you don't you may have to reboot.

There are two service methods in your service. OnStart and OnStop. They are pretty self-explanatory. I won't get into using the event log. I couldn't get that to work right. Now believe it or not, most of that was fluff. The real point of this article is to show you how to write an app that sleeps and works.

We will be using a thread to sleep and work. OnStart is where you create and start the thread. A thread that sleeps and works needs to know two things: How long to sleep and what to do when it wakes up. In OnStart we define these two things.

Protected Overrides Sub OnStart(ByVal args() As String)

'Set the sleep interval
lngSleepInterval = 60000

'Set the thread to process the running method
Thread = New System.Threading.Thread(AddressOf Me.running)

' Start the new thread.
Thread.Start()
End Sub

Yes we defined lngSleepInterval as an instance variable outside the function. Bad form I know but who cares. Me.running is of course our worker function.

Public Sub running()
Try
runningx()
Catch ex As Exception
'Do some error handling
End Try
End Sub

Hmmm our worker function actually calls another worker function encased in a try...catch block. How interesting. Error handling removed because its proprietary. Here is what our actual worker does.

Public Sub runningx()
blnRunning = True

Dim blnSkipInterval = False

While (blnRunning)

'Do work here


'Sleep after running
If Not blnSkipInterval Then
System.Threading.Thread.CurrentThread.Sleep(lngSleepInterval)
Else
blnSkipInterval = False
End If
End While
End Sub

End Class

blnRunning is our stop condition. Set this to false and our thread will stop after its current run. Sometimes we work lazily and sometimes we work diligently. Our thread only stops working if there's no work to do, and the first step of any job is to check if there's any work to do. Thus, after finishing our present task, we should not sleep. Rather we should check if we have more work to do. This is what blnSkipInterval will do.

To stop the worker thread, we look a OnStop. Inside we merely set the blnRunning flag to false and wait for the app to stop.

Protected Overrides Sub OnStop()
blnRunning = False
End Sub


That is Windows Services in a nutshell. Thanks for reading.

July 02, 2007

Code signing J2ME apps

I do a range of diverse things, so its a bit cool that I can talk about Kerberos and LDAP one day and talk about ASP shell scripts and J2ME code signing the next. There are a few good websites that talk about J2ME code signing. I know because I read them and followed their advice. That said, I still had work to do on my own J2ME project because some things just aren't documented. Perhaps an expert takes these things for granted and so the problem never occurs to the expert and as such, the expert doesn't document that. Anyway enough talk.

First step is to create a keystore. You can do this via command line using keytool which is distributed with the JDK. I used netbeans because sometimes I make typo errors. Typo errors are easier to correct via GUI than CLI. You will create a keystore, which is protected by a keystore password and a key-pair which is given an alias (a friendly name) and a key-pair password. Remember these passwords well.

Lets call our keystore file keystorefile.ks and our key-pair mykey. This makes examples easier to understand. Once the keystore is created you can do little things to them using keytool.
For example:


  • View keys in the keystore

  • keytool.exe -list -keystore keystorefile.ks

  • Export keys into a file

  • keytool.exe -export -alias mykey -keystore keystorefile.ks -file mykey.crt

  • Export keys into a readable format

  • keytool.exe -export -alias mykey -keystore keystorefile.ks -rfc -file mykey.crt

  • Print a key from the file to the screen

  • keytool.exe -printcert -file vtoken.crt


Note: Once you export your key to a file, we start calling that a certificate. Who knows why?

Now that you're done playing with yourself, you probably want to get a Certificate Authority (CA) to sign the cert. So you have to create a certificate signing request (CSR) and send it to the CA.

keytool.exe -certreq -alias mykey-keystore keystorefile.ks –file mykey.csr

mykey.csr is a text which starts with
----BEGIN NEW CERTIFICATE REQUEST-----
and ends with
-----END NEW CERTIFICATE REQUEST-----

You will send this to the CA, through their website. I used Verisign because apparently they are supported by the most number of phones. After Verisign has signed the cert, they will send it back to you. You will need to import it back into the SAME keystore file and the SAME alias. I told you those passwords are important. Its a good thing you didn't flipflop on your decision to buy the cert and prolong a 1 day process into a 3 month nightmare complaining that making online purchases is against company policy and that its terribly difficult faxing things overseas, and making international phone calls as well as arm-twisting your vendor to give you the certificate for free. Yes its a good thing you didn't do that.

Now that you've found your keystore file and certificate alias and the passwords to your keystore and key-pair, its time to import the signed cert.

keytool -import -file c:\casigned.cert -keystore keystorefile.ks -alias mykey

Done. Now you can sign J2ME applications by unlocking the keystore and key-pair.

June 22, 2007

Shell commands from classical ASP

If for some reason your boss think its a good idea to make shell calls from ASP, this web page may help you, regardless of whether or not you feel compelled to agree to his ridiculous demands. Certainly there are right a proper uses for this technology but we are not here to judge, only to code.

Its actually quite simple. Three easy lines to remember. First we create the object. The object we want to create is the scripting object called wscript.shell.


set wshell = server.createobject("wscript.shell")


The next line is the command we want to run. Let's not worry ourselves with silly scripts and what have you. Put whatever you want to execute in an EXE or BAT and call it.


intReturn = wshell.run("c:\myCommand.exe")


Lastly a good programmer releases whatever he/she has taken.


set wshell = nothing


Here are the 5 important notes which you must know:


  1. If you enclose your asp scripting with anything other than <% ... %> you may be in trouble.

  2. The process runs under IWAM_MachineName. If your computer is called ServerA, That user is IWAM_ServerA. Thus you must give that user execute rights to your executing exe which is myCommand.exe and other other resource it uses such as folders and log files.

  3. IWAM_MachineName is hardly ever logged on interactively (like never) so don't expect code such as MsgBox("Hello world") or running notepad.exe to work. It won't!

  4. The exe runs asynchronously. Which means line 2 returns before the application has finished running. Probably there's a way for the thread to wait but I can't be bothered about that now.

  5. Running shells in a webserver is .... not advisable. Don't try it unless you know what you're doing and even if you are I'm not responsible if your webserver gets hacked.


Thanks and goodnight

June 04, 2007

Web services for C

I won't get into a long preamble about what a web service is. Just one paragraph, you can skip to the next paragraph if you like. Web services are among the easiest things to code. Usually they are simple function calls with primitive input and output data types. Doing anything more complex is counter-productive. It's meant to be something that can process something and return the result almost immediately. So by design web services should be simple.

I was tasked to modify an existing application - written in C to make web service calls from an existing Java based web service deployed using Sun Application Server PE9. In VB.NET. I could do this in 2 minutes. In C on Linux, it takes a bit longer, and that is even after knowing what to do. I took me half a day (6 hours) to get to work. But with this article, you can do it in 5 minutes. Let's begin.

I used GSoap. You can use something else (like Apache Axis2) but then you'd have to stop reading this article because I can't help you. GSoap has documentation and I read it, most of it but the document is badly written. Most documentation is badly written that's why I have this blog. To redocument the badly documented projects. Oh by the way you should start downloading GSoap so that it will be fully downloaded by the time you finish reading about how its documentation sucks. Oh by the way, the files are hosted on source forge with requires you to click here and there and the download link is too tiny to see and contains no useful information anyway. So click here It gets you a few clicks closer to downloading GSoap.

I'll divide the guide into three parts. Pre setup, Setup and Post setup. Clear?

Pre Setup

Install it somewhere Doesn't really matter where. That means:


mkdir somewhere
cd somewhere
gunzip gsoap_linux_2.7.9f.tar.gz
tar xvf gsoap_linux_2.7.9f.tar


I'll only show you the client stuff. Maybe its trivial but if it was why did I spend 6 hours getting it to work? Make a working directory to put all your crap. That means:

mkdir working
cd working


Copy the following files from the gsoap directory to your working directory.

gsoap-linux-2.7/bin/wsdl2h
gsoap-linux-2.7/bin/soapcpp2
gsoap-linux-2.7/stdsoap2.c
gsoap-linux-2.7/stdsoap2.h


Setup

That's it for presetup. We're ready to setup. You need the WSDL file. Hopefully its hosted on a webserver somewhere. There's a url to it. I'm not going to show the WSDL file. Its proprietary so bite me.

http://192.168.1.21:8080/myWeb/myWebService?wsdl


So we run wsdl2h. The -c argument generates c code. myWeb.h is a header file which is read by the other preprocessor soapcpp2. This generates myWeb.h as you can imagine.

cd working
./wsdl2h -c -o myWeb.h http://192.168.1.21:8080/myWeb/myWebService?wsdl


Now go open myWeb.h in your favourite text editor. Around line [165] you should see something like

//gsoap ns1 service name: long_and_painful_service_name_generated_by_stupid_computer_code

Replace this with

//gsoap ns1 service name: myWeb


Its time to generate a whole bunch of other files which you never knew you needed. Here the -c argument tells it to generate c code, or that you want client stuff. Regardless, just use -c, thanks.

./soapcpp2 -c myWeb.h


Post Setup
Now you have a whole bunch of files in your working directory. Aren't you glad you used a working directory instead of your home directory or the gsoap bin directory? The last step is to write the client. Create your client.c file and import your usual libraries.

#include <stdio.h>
#include <stdlib.h>
#include "soapH.H"
#include "myWeb.nsmap"


myWeb.nsmap already includes soapH.h but that's beside the point. You could do away with myWeb.nsmap if you want by including its contents in the main file but I guess the idea is to interchange the nsmap. Details! Bottomline is that soapH.h does all the work. nsmap is the configuration file for 'some' things. More code...

Write your main function and a simple hello world. Compile it to make sure all the headers and libraries are linked.

int main
(int argc,char** argv) {
printf("Soap client");
}


Here's the compile command in case you are new to c. I was.

gcc -o myWebClient.bin client.c stdsoap2.c soapC.c soapClient.c


myWebClient.bin is the executable to be generated. Run it using

./myWebClient.bin

stdSoap2.c you copied from the gsoap folder in the presetup phase. soapC.c and soapClient.c you generated using soapcpp2 in the setup phase. More code...


// create context
struct soap * soap = soap_new();

//do stuff

// clean up
soap_destroy(soap);
soap_end(soap);
soap_done(soap);


You could use soap instead of soap * but lets not. It would mean using &soap when calling destroy, end and done. I hate pointers.

In the do stuff section we define our input and output parameters.

struct ns2__myFunctionResponse response;
struct ns2__myFunction request;


If your function has input parameters, set them up now. I don't so I completely made this code up. The request variable is a struct so we deference its members using the dot notation. C experts are laughing at me.

request.param1 = 1;


Call your function

if ((soap_call___ns1__myFunction( soap, NULL, NULL, &request, &response)) == SOAP_OK) {
printf("Success");
} else {
soap_print_fault(soap, stderr);
}

Note 1: The first NULL can be replaced with the web service end point. Sometimes the WSDL file will contain the hostname rather than the IP and your client computer can't resolve the hostname, so you better check and put in ip-based endpoint instead of NULL.
Note 2: The second NULL is the soap action. I don't know what this value should be so we set it to default based on the WSDL.
Note 3: If your response has any values to return, you can reference them using

response.param1

Note 4: This code might not work yet.

Now that we have the client set up, let's spend a few hours trying to figure out why it doesn't work. Changing the endpoint through a proxy lets us view the request and response. Changing the request and pushing it through telnet lets us test possible reasons why it doesn't work. Coding a new client in VB.NET and analysing why IT works but our gsoap client doesn't also helps. Now we have the answer. gsoap uses a particular version of soap (Soap 1.2) but our application server, Sun Application Server PE9 only accepts an earlier version of soap (Soap 1.1). So we edit myWeb.nsmap to tell the gsoap toolkit to use soap 1.1 and who's your daddy.

Replace the similar looking lines in myWeb.nsmap with this.

{"SOAP-ENV", "http://schemas.xmlsoap.org/soap/envelope/", "http://www.w3.org/2002/06/soap-encoding"},
{"SOAP-ENC", "http://schemas.xmlsoap.org/soap/encoding/", "http://www.w3.org/2002/06/soap-envelope"},

See this nugget of documentation for more information.

Thats it! A working Linux-C webservice client. It might take 5 minutes to run this tutorial but it took me 2 hours to write and 6 hours to research. If you'd like to help me out. Paypal me some money.

May 07, 2007

Safety on the Internet

I was browsing the IT stacks at the nearby bookstore, looking for Kerberos or Linux security books, when I noticed several home network security books designed to teach home users how to safely access the internet without turning their home pc into part of a botnet. I recalled my friends wrote a similar book many years ago. I thought it was a great resource. I have a signed first edition copy.

The environment has changed somewhat since that day. I know a lot more about networks and security than I did when the book first came out. The World Wide Web has also become 'wilder'. I guess you could add another W to WWW. If I could give just one piece of advice to someone who is going the internet for the first time, it would be "Don't go on the Internet".

Your home PC could be infected in minutes, disabled in days and keyloggers, phishers and trojans could have all your bank account information without your knowledge in a few weeks or less. What should you do?

Start using the internet from your office, a cybercafe or a live CD. That will educate you without exposing your home pc to any undesirables. Furthermore, these systems are usually more protected than others. But during that time, stay away from any sites which require you to provide your actual personal information. Use a dormant email account when sites ask you to register. I keep a hotmail account just for that purpose. Once you've learned the basics of the web, its time to protect your home pc. What you will need is
1. Discipline
2. Firewall
3. Anti-virus

Strictly speaking, if you have [1] you don't need [2] and [3]. But just to be safe, have all three. My personal observation is that I end up disabling my firewall, and not running anti-virus checks so effectively I'm running without [2] and [3] and so far, nothing too terrible has happened to my PC. So rather than talk about which firewalls and anti-virus to get, I'll talk about discipline. You can learn about firewalls and anti-virus from other sites. In MS Vista, those two items are already bundled in your OS.

Discipline Tip #1: Don't surf for porn
Out of 10000 sites offering free porn, only 1 actually has free porn which you can download safely. You have a better chance at winning money from a scratch ticket than actually getting free porn which doesn't screw up your computer. So just stop that. Buy/Rent a DVD from your local video store instead.

Discipline Tip #2: Don't open email from people you don't know. Even if you do know them, don't click on any links. Don't forward email to people. So you miss out on the latest novelty. I'm sure someone will explain it to you if you ask them nicely. Don't ask me why you shouldn't. The answer is terribly complicated and you won't understand it anyway.

Discipline Tip #3: If someone offers you something for nothing, and you believe them, you are being cheated.

May 03, 2007

Getting started with LDAP on Java

Your boss asked you to do some research on using LDAP with Java. Its friday morning and you're already in weekend mode. You fire up your favourite search engine (google) and what you get are complicated articles and tutorials which could take you days to go through. If this is you, read on.

To play with LDAP you need an LDAP server. Rather than waste an morning compiling and installing one from OpenLDAP, you could :
1. Use someone elses LDAP server
2. Get a trial copy of a simple LDAP server

I got a simple LDAP server to install locally because I wanted to add LDAP records and I need a user account to do that. Public LDAP servers usually will not allow you to do that.

Since you're coding with Java, you need a Java compiler. I fire up my trusty Netbeans. You can use whatever you want. We're only going to code a main method anyway.

Once the LDAP server is installed and running, there aren't any entries inside. So the first thing to do is to add the entries. If you're only interested in searching the LDAP directory, skip down a few paragraphs.

First your imports. The IDE takes care of this for me but here's the list. We're using JNDI packages and it should be in JDKs 1.4 and higher.

import java.util.Properties;
import javax.naming.*;
import javax.naming.directory.*;


The connection settings go inside a properties object.

Properties props = new Properties();
props.setProperty(Context.INITIAL_CONTEXT_FACTORY, "com.sun.jndi.ldap.LdapCtxFactory");
props.setProperty(Context.URL_PKG_PREFIXES, "com.sun.jndi.url");
props.setProperty(Context.REFERRAL, "ignore");
props.setProperty(Context.SECURITY_AUTHENTICATION, "simple");


Host name goes here


props.setProperty(Context.PROVIDER_URL, "ldap://localhost:389");


Username and password goes here. If you're using a public LDAP server, these may be blank or have some default value. It depends.....

props.setProperty(Context.SECURITY_PRINCIPAL, "cn=manager,dc=example,dc=com");
props.setProperty(Context.SECURITY_CREDENTIALS, "");


Note above. The username is manager. the password is blank. The string security principal describes the user being from directory context example.com. The order is important. You may need to change the dc appropriately on public servers.

When its all set up, just call the statement below to get the initial context.

ctx = new InitialDirContext(props);

This is like a pointer to a directory. With the context, you can work on the LDAP. First we create a set of attributes. Basically we're adding a record which conforms to a schema. A schema defines what fields an object can and must have. The example we will use is netwinperson. A schema is also known as an object class. The netwinperson defines a person. It has two mandatory fields cn (Common name) and sn (Surname) and a bunch of optional fields. In Java its possible to create an object which maps to this schema. We'll reserve that for future blog entries. Right now, we'll create a set of attributes which we will assign a name.

Attribute cn = new BasicAttribute("cn", "Scott");
Attribute sn = new BasicAttribute("sn", "Smith");
Attribute mail = new BasicAttribute("mail", "newuser@foo.com");


Next we must have another attribute for the object class. Attributes have names and one or more values.

Attribute oc = new BasicAttribute("objectClass");
oc.add("netwinperson");


Now we create the entry which is a collection of attributes

Attributes entry = new BasicAttributes();
entry.put(oc);
entry.put(cn);
entry.put(sn);
entry.put(mail);


Now we add the entry.

try {
ctx.bind("cn=Scott,dc=example,dc=com",null,entry);
} catch (NamingException ex) {
ex.printStackTrace();
}


Here is where we search the LDAP for the entry we just created.

SearchControls constraints = new SearchControls();
constraints.setSearchScope(SearchControls.SUBTREE_SCOPE);String filter = "cn=Scott";
String BASE_SEARCH = "dc=example,dc=com";
NamingEnumeration results = ctx.search(BASE_SEARCH, filter, constraints);


Note our search filter uses the cn attribute. We can use wildcards here. Note also the BASE_SEARCH tell us where to start searching. In this case from the root which is example.com. Our results appear in the variable results. We can check this enumeration object for any matches, but I just output what I know is there.

System.out.println(results.next().toString());


This outputs the entire entry. We can drill down to output individual entries but I'm only here to get you started.

Since we're done, we close the connection like a good programmer should.

ctx.close();

I'm no expert on LDAP. What I write here is what I found online in the course of one friday morning. But this code should get you started in less than an hour.