July 19, 2007

Microsoft Message Queue from Classical ASP

After days and days of doing absolutely nothing, I needed something to reaffirm my skills. Here it is - a task assigned to a couple of junior programmers. They weren't able to complete. Their supervisors weren't able to help them. Enter technosock! I took on the challenge and succeeded. Yay! The problem: We have a long running ASP transaction. We want to use MSMQ to store the event and do the processing later. Task: Use ASP to store the event.

Setup

MSMQ needs to be installed on a domain controller. I think so. So create a Windows 2003 server, and a new domain. I make it the Primary Domain Controller. I also install the Microsoft Message Queue components. All of them.

On the client side, I tried writing VB6 code from my PC - it didn't work. My guess is that you have to be a domain member. Fuck that! I'll write ASP and host it directly of the server in question. So I install IIS and enable Classical ASP (its disabled by default).

Code

There are four functions which I tried. First of all, we need to create the queue. Secondly, we write a message to the queue. Thirdly we read from the queue and fourth we delete the queue. Straight forward? Yes.

Create the queue


Set qi = Server.CreateObject("MSMQ.MSMQQueueInfo")
qi.PathName = ".\MyQueue"
qi.Create


qi is a queue info. MyQueue is the name of the queue. .\ means use the local hostname.

Send a message the queue


DIM MQ_SEND_ACCESS, MQ_DENY_NONE
MQ_SEND_ACCESS = 2
MQ_DENY_NONE = 0

Set qi = Server.CreateObject("MSMQ.MSMQQueueInfo")
Set msg= Server.CreateObject("MSMQ.MSMQMessage")
qi.PathName = ".\MyQueue"
Set objQ = qi.Open( MQ_SEND_ACCESS, MQ_DENY_NONE )

msg.Label = "Label"
msg.Body = "Body"

msg.Send objQ, 0


objQ is the queue. Use qi.Open to get it. The parameters MQ_SEND_ACCESS and MQ_DENY_NONE are constants. The values are 2 and 0. Create a message object msg then send it to the queue objQ.


Receive a message from the queue


Dim qi
Dim ReceiveQ
Dim msg
DIM MQ_DENY_NONE
Dim MQ_RECEIVE_ACCESS

MQ_DENY_NONE = 0
MQ_RECEIVE_ACCESS = 1

Set qi = Server.CreateObject("MSMQ.MSMQQueueInfo")
Set msg = Server.CreateObject("MSMQ.MSMQMessage")

qi.PathName = ".\MyQueue"

Set ReceiveQ = qi.Open(MQ_RECEIVE_ACCESS, MQ_DENY_NONE)

Set msg = ReceiveQ.Receive(3, false, true, 1000, false)
If msg is Nothing Then
     Response.write "No message was received"
Else
     Response.write "Message received<br>"
     Response.write msg.Body
End If

ReceiveQ.Close


ReceiveQ is the queue. Its opened with MQ_RECEIVE_ACCESS. Call ReceiveQ.Receive to get the message. The parameters 3, false, true, 1000, false are mostly flags. The value 1000 is the timeout in milliseconds.

Delete the queue


Set qi = Server.CreateObject("MSMQ.MSMQQueueInfo")
qi.PathName = ".\MyQueue"
qi.Delete


Same as the first snippet. Just change Create to Delete

Conclusion

There you have it. MSMQ in under five minutes. Ok so it took a couple hours to set up Windows Server 2003 and IIS and MSMQ. But after you start writing ASP code, its just a few lines of code. There's lots more you can do with message queues like sending binary objects, restricting who has access to the queue and so forth. Message Queues are a good idea. MS has some good tools but documentation is a but lacking in my opinion. I had trouble searching for most of the things - could be because my connection is terrible. Anyway I've done all the hard stuff so you don't have to.
July 16, 2007

Project Guest Manager

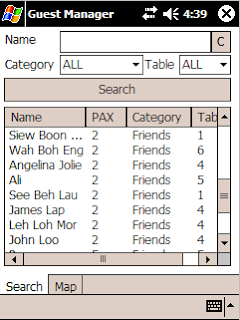
Sometimes when I'm bored or when there is a need, I need applications for my own use, or for fun. I'll highlight them here from time to time. This application I started one afternoon when I was bored. It's a guest list manager which is comprised of a read-only Pocket PC mobile client and a desktop application which allows you to enter guest names, number of guests, their category and which table they will sit. It's very Chinese banquet oriented because the tables seat a recommended 10 people.

I wrote the Pocket PC mobile client first. It took about 10 hours over friday-sunday. The desktop application also took about 10 hours, over monday-tuesday. The database is a pocket access database but as I found out, ADOCE has been discontinued for windows mobile 5 which makes my app obsolete before even being released. Thus my dreams of charging people for my 20 hours of work has gone down the drain. I hate you Microsoft. Pocket Access wasn't great but at least it filled a need. The need to have a database sync to pocket pc automatically. I didn't need the fancy table joins and macros. I didn't need super high performance.

Anyway the apps are simple. On pocket PC you need three files.


  1. GuestManager.exe (which is an ARM based pocket PC app)

  2. \My documents\GuestList.cdb (which is a pocket access database - converted from a desktop MDB)

  3. \My documents\map.png (which is the table layout of the banquet you're organizing).


The trick is converting the MDB to CDB. You need an old Active Sync. If your Pocket PC can't work with an old Active Sync, you're out of luck.

On the desktop you need the GuestManagerDesktop.exe and the GuestList.mdb in the same directory.

The desktop app does some cool things.

  1. It stores state information in an xml file. It remembers the location of the last database and reloads it.

  2. We print 3 types of documents (alphabetical guest list, guests by table, guest by category) without use of special report components. It's not easy because it involves complex looping and special index and counters.


Some features of the desktop app.

  • Add any number of tables and categories just by adding a guest to the table or category. The table and category are combo-boxes which allow test entry. It supports special characters (as far as i know) - Not sure about unicode though.

  • Guest list is browsable by table and the application indicates unfilled, filled, and overfilled tables using colour cues.

  • Able to delete and move guests by right-clicking on the guest name or selecting from the menu.

  • Able to change guest details by selecting the guest, changing the details and clicking on Save.

  • Save will either insert a new guest or update an existing one, depending on whether the guest already exists.

  • Performs analysis of guest to table distribution.

  • Console log allows you to revisit all the actions performed in that session.

  • Allows printing of three kind of reports with checklist boxes:

  • a. table listing
    b. alphabetical guest listing
    c. listing by category

I'm pretty happy with the app. It could use a bit more polish such a splash screen or a nag window and some crippleware. Maybe the log could be persistant.

July 05, 2007

Windows Services

I would write more articles if things worked right and I understood everything. But sometimes things go wrong and I don't really know why and I can't be bothered to find out why. About a year ago I followed some articles online and wrote a Windows Service in VB.NET. Everything worked great. I had a service I could start and stop. The service had its own event log. Yesterday I tried to recreate the service for another project. It didn't want to create its own event log, and that's why I can't write about it.

But I don't care. Maybe if I solve the problem, I'll add a comment to this entry but here is a guide on writing a Windows Service using VB.NET. There are other guides available. Its actually quite simple so any guide will do. This is mine.

If you have MS Visual Studio .NET, you will probably have a project type option called Windows Service. Select that! The project loads and your workspace is all gray. Click inside the gray area and click on Add Installer. That will create another gray area with two things inside. You have to edit a few properties on the Service Installer and Service Process Installer such as:


  1. The account under which the service will run

  2. The service name

  3. The service description


Now you need to get installutil.exe from somewhere. I think its in the dotnet framework. Put it in your bin folder. Write a couple batch programs to install and uninstall the service. If your service compiles to Service.exe your install script will be
installutil Service.exe
Your uninstall script will be
installutil /u Service.exe

Build your project and run the install. Go to Services (Administrative Tools) and manually start your service. There... it runs. Now stop the service. And run the uninstall script. You have to do this everytime before you compile your app. Remember to stop your service and uninstall. If you don't you may have to reboot.

There are two service methods in your service. OnStart and OnStop. They are pretty self-explanatory. I won't get into using the event log. I couldn't get that to work right. Now believe it or not, most of that was fluff. The real point of this article is to show you how to write an app that sleeps and works.

We will be using a thread to sleep and work. OnStart is where you create and start the thread. A thread that sleeps and works needs to know two things: How long to sleep and what to do when it wakes up. In OnStart we define these two things.

Protected Overrides Sub OnStart(ByVal args() As String)

'Set the sleep interval
lngSleepInterval = 60000

'Set the thread to process the running method
Thread = New System.Threading.Thread(AddressOf Me.running)

' Start the new thread.
Thread.Start()
End Sub

Yes we defined lngSleepInterval as an instance variable outside the function. Bad form I know but who cares. Me.running is of course our worker function.

Public Sub running()
Try
runningx()
Catch ex As Exception
'Do some error handling
End Try
End Sub

Hmmm our worker function actually calls another worker function encased in a try...catch block. How interesting. Error handling removed because its proprietary. Here is what our actual worker does.

Public Sub runningx()
blnRunning = True

Dim blnSkipInterval = False

While (blnRunning)

'Do work here


'Sleep after running
If Not blnSkipInterval Then
System.Threading.Thread.CurrentThread.Sleep(lngSleepInterval)
Else
blnSkipInterval = False
End If
End While
End Sub

End Class

blnRunning is our stop condition. Set this to false and our thread will stop after its current run. Sometimes we work lazily and sometimes we work diligently. Our thread only stops working if there's no work to do, and the first step of any job is to check if there's any work to do. Thus, after finishing our present task, we should not sleep. Rather we should check if we have more work to do. This is what blnSkipInterval will do.

To stop the worker thread, we look a OnStop. Inside we merely set the blnRunning flag to false and wait for the app to stop.

Protected Overrides Sub OnStop()
blnRunning = False
End Sub


That is Windows Services in a nutshell. Thanks for reading.

July 02, 2007

Code signing J2ME apps

I do a range of diverse things, so its a bit cool that I can talk about Kerberos and LDAP one day and talk about ASP shell scripts and J2ME code signing the next. There are a few good websites that talk about J2ME code signing. I know because I read them and followed their advice. That said, I still had work to do on my own J2ME project because some things just aren't documented. Perhaps an expert takes these things for granted and so the problem never occurs to the expert and as such, the expert doesn't document that. Anyway enough talk.

First step is to create a keystore. You can do this via command line using keytool which is distributed with the JDK. I used netbeans because sometimes I make typo errors. Typo errors are easier to correct via GUI than CLI. You will create a keystore, which is protected by a keystore password and a key-pair which is given an alias (a friendly name) and a key-pair password. Remember these passwords well.

Lets call our keystore file keystorefile.ks and our key-pair mykey. This makes examples easier to understand. Once the keystore is created you can do little things to them using keytool.
For example:


  • View keys in the keystore

  • keytool.exe -list -keystore keystorefile.ks

  • Export keys into a file

  • keytool.exe -export -alias mykey -keystore keystorefile.ks -file mykey.crt

  • Export keys into a readable format

  • keytool.exe -export -alias mykey -keystore keystorefile.ks -rfc -file mykey.crt

  • Print a key from the file to the screen

  • keytool.exe -printcert -file vtoken.crt


Note: Once you export your key to a file, we start calling that a certificate. Who knows why?

Now that you're done playing with yourself, you probably want to get a Certificate Authority (CA) to sign the cert. So you have to create a certificate signing request (CSR) and send it to the CA.

keytool.exe -certreq -alias mykey-keystore keystorefile.ks –file mykey.csr

mykey.csr is a text which starts with
----BEGIN NEW CERTIFICATE REQUEST-----
and ends with
-----END NEW CERTIFICATE REQUEST-----

You will send this to the CA, through their website. I used Verisign because apparently they are supported by the most number of phones. After Verisign has signed the cert, they will send it back to you. You will need to import it back into the SAME keystore file and the SAME alias. I told you those passwords are important. Its a good thing you didn't flipflop on your decision to buy the cert and prolong a 1 day process into a 3 month nightmare complaining that making online purchases is against company policy and that its terribly difficult faxing things overseas, and making international phone calls as well as arm-twisting your vendor to give you the certificate for free. Yes its a good thing you didn't do that.

Now that you've found your keystore file and certificate alias and the passwords to your keystore and key-pair, its time to import the signed cert.

keytool -import -file c:\casigned.cert -keystore keystorefile.ks -alias mykey

Done. Now you can sign J2ME applications by unlocking the keystore and key-pair.